In the 2nd group, a periodic or transient heat flow is established in the sample. In comparison with the first group, the transient or non-steady state techniques for thermal conductivity are appealing in that the test time is comparatively short, small specimens can be measured, and formed products can be tested (e. g. films, sheets and mouldings). Two Examples of this group are the transient plane source (TPS)( Gustafsson, 1991) to determine the thermal conductivity, thermal diffusivity and their anisotropy (Suleiman et al. 1999) & (Fan et al.,2006), and the transient line-source probe method (Dawson et al., 2006).
The transient line-source probe technique, also known as the needle probe method, is a development of the hot wire method but is suited for testing molten composites in both their molten and solid states (Dawson et al., 2006). A thermocouple and linear heating element are enclosed and casted in a form of a needle, which is typically 50-100 mm in length and 1.5 – 2 mm in diameter. The heater is positioned along the length of the needle and the thermocouple is anchored at the middle position. The needle is immersed and held in the sample until temperature equilibrium is achieved at the desired temperature. Then, by applying a voltage across the resistance heater during a specified time period a heat wave propagates through the sample in the radial direction. The thermal conductivity is determined from the temperature-time profile of the probe. It should be noted that the temperature-time profile (the rate of temperature rise) is sensitive to and depended on the magnitude of the thermal conductivity of the test-sample. It is low profile for higher conductivity and visa versa. Due to this sensitivity and other factors such as the finite probe dimensions and end effects, the technique requires the probe to be calibrated using a reference material with known thermal conductivity (ASTM D5930-01).
More attention will be given to the TPS technique due the fact that most of the experimental data and results discussed in this work are obtained using the TPS technique.
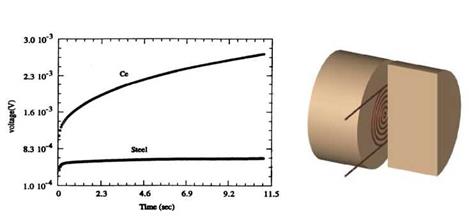
The principle of this technique is simple. The sample is initially kept at thermal equilibrium, and then a small disturbance is applied to the sample in a form of a short heating pulse through the heater/sensor. The temperature profile is characterized by a transient temperature rise of a plane heat source/sensor, known as Hot Disk (Gustafsson, 1991). The hot disk is a thin resistive element, in the form of a bifilar spiral, which acts as both a heat source and a temperature sensor, a schematic drawing is depicted in fig 1. Measurements are simply performed by recording the voltage (resistance/temperature) variations across the sensor during the passage of a heating current in a form of a constant electrical pulse. Figure 1 shows actual recordings of low conductivity ceramic and relatively high conductivity steel samples. These recordings correspond to relatively low temperature rises (around one degree) across the samples. Using this type of sensor, it is possible to measure both the heat input and the temperature increase, from which both the thermal conductivity and thermal diffusivity are simultaneously determined. The theory of the TPS method is based on a three-dimensional heat flow inside the sample, which can be regarded as an infinite medium, if the time of the transient recording is ended before the thermal wave reaches the boundaries of the sample. To validate the theory of the method, the diameter of the sample should be larger than the diameter of the disk as shown schematically in figure 1. In other words; the sample is large enough so that it can be regarded as infinite medium provided that the time of the transient recording is ended before the thermal wave reaches the boundaries of the sample and produces edge effects. Edge effects can be prevented by satisfying a criterion concerning the probing (penetration) depth. The criterion is associated with the total time of the transient event which is proportional to the square of the overall dimension of the conduction pattern or the distance from the conducting pattern to the nearest free surface of the sample. This is evident from the expression for the probing depth (Gustafsson, 1991) Ap = в (tmax к )У2, where tmax is the total time of the recording, к is the thermal diffusivity of the specimen and в is an adjustable parameter that is related to the relative sizes of the sensor and the specimen, and indirectly correlated with the experimental accuracy. The probing depth and the specimen size are intimately connected in the sense that the shortest distance from any point on the sensor element to the nearest point on any of the free surface of the specimen must always exceed Ap to avoid edge effects. Edge effects due to the reflected thermal wave at the boundaries disturb the measurements and affect the accuracy. To achieve high accuracy in our measurements, a в-value of 1.42 seems to define reasonably well the probing depth. The assessment of the temperature increase AT(t) in the heater depends on several factors such as the power output in the sensor element, the design parameters of the sensor, and the thermal transport properties of the surrounding specimen. For the disk-shaped sensor, the thermal conductivity and diffusivity can be obtained from AT(t) that is given by the following equation:
AT(t) = Po (Tr/2aX)-1 D(t) (1)
Here Po is the total output power, X is the thermal conductivity of the test-sample, and a is the radius of the sensor. D(t) is the theoretical expression (Suleiman, 1994) of the time dependent temperature increase, which describes the conducting pattern of a disk-shaped sensor, assuming that the disk consists of a number m of concentric ring sources.
|
Fig. 1. A typical voltage recordings and a schematic drawing of sample/sensor experimental set-up |
This technique has an additional advantage of using a flat thin sensor, which makes it more suitable to substantially, reduce the contact resistance between the specimen and the sensor. This technique has been used several times to report thermal conductivity measurements over a wide range of temperatures (Gustafsson, 1991) & (Suleiman et al, 1996) including the data presented in next section. A full complete description of the experimental capability regarding precision/ accuracy and reproducibility of the measured data of various applications is given elsewhere (Suleiman, 1994).


