After the priority areas are placed and dimensioned, add the other fixtures and features in the plan. Continue checking dimensions by subtracting the amount of clearances for each fixture from the remaining wall space. Be sure to verify dimensions in each direction, such as each side and in front of the fixture. Allow for door swings.
Sometimes, at this point, the dimensions do not work out. You may find that your total space, for fixtures, cabinetry, and clearances comes to more or less than the length of a wall. If this is the case, you may need to consider different alternatives.
If you have extra space, you may decide to increase the clearances around the fixtures. This is a good solution if you do not have a lot of extra space. For example, instead of the recommended 20 inches (508 mm) of clearance from the centerline of the lavatory to a wall, you could increase the clearance to 22 inches (559 mm).
Another alternative is to increase the size of a fixture, such as selecting a 42-inch (1067 mm) shower instead of a 36 inch (914 mm). The same idea could be implemented by selecting a 36-inch (914 mm) vanity cabinet instead of a 30 inch (762 mm). However, if you have a large amount of additional space, you might want to reconsider your design to determine if you have chosen the best solution.
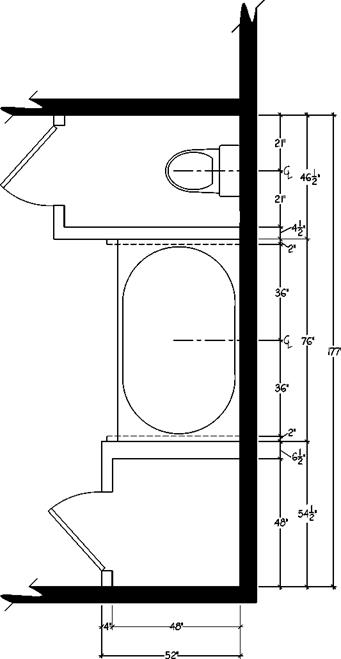
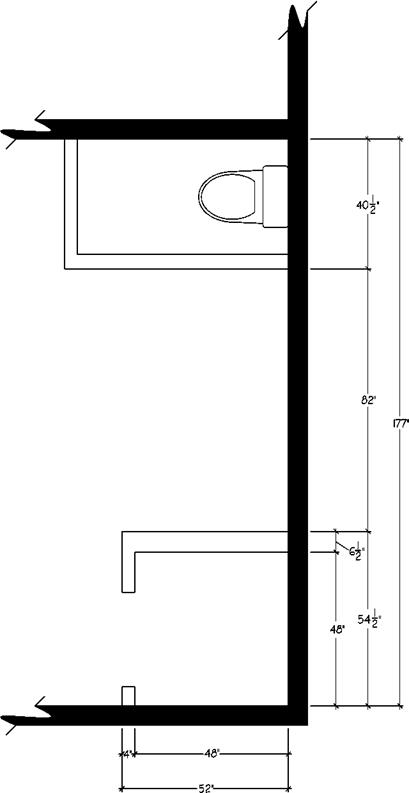
In our example (Figures 10.8, 10.9, and 10.10), we have 82 inches (2083 mm) remaining after the toilet and shower are placed. The jetted tub needs 72 inches (1829 mm). No additional wall thickness is needed as we are placing the tub between two full-height walls. Therefore, we have 10 inches (82 inches – 72 inches = 10 inches) (2083 mm – 1829 mm = 254 mm extra space). We can solve this by adding 6 inches clearance to the toilet compartment (3 inches on each side) (152 mm clearance of 76 mm on each side), and lengthening the deck of the jetted tub by 4 inches (2 inches on each side) (102 mm or 51 mm on each side) (Figure 10.10).
If you are short on space, the solution can be more challenging. As you consider each alternative, review your design program to make sure that changes do not compromise important needs of the design. Think about design solutions that work best for your client. Some ideas for alternatives:
• Reduce the clearances around a fixture. If you have allowed generous clearances, you might reduce one or more of them. In the toilet area, for example, instead of the recommended 18 inches (457 mm) of clearance on either side of the centerline, you might use 17 inches
|
|
|
FIGURE 10.9 Continuing the drawing begun in Figure 10,8 for Adia’s and Leroy’s bathroom design, a 48-inch (1219 mm) custom shower is placed on the same wall as the toilet, NKBA |

|
(432 mm) or 16 inches (407 mm). Do not reduce clearances to less than the minimums identified in the Bathroom Planning Guidelines as code-based requirements.
• Use smaller fixtures or cabinetry. For example, instead of a 42 inch (1067 mm) square shower, consider a 42 inch by 36 inch (1067 mm by 914 mm), or 36 inch (914 mm) square shower. Again, make sure that you meet code-based minimums.
• Choose alternative fixtures or design elements. For example, instead of two, side-by-side vanities, each with a lavatory, choose one larger vanity cabinet with a single lavatory, which takes less total space. Or, choose a full-height, pantry-style cabinet to provide the same amount of storage as two vanity cabinets, but in less floor space.
• Choose cabinetry with smaller doors, to reduce door swings. This might be a smaller cabinet, such as going from a 24-inch (610 mm) cabinet to a 21-inch (533 mm) cabinet, or going from
a single-door 24-inch (610 mm) cabinet to a two-door cabinet. However, consider the functionality of the size of the door opening and the continuity of cabinet spacing when making size alterations.
You may need to try several alternatives to make sure your layout fits the actual space. As you are exploring alternatives, be sure that you are working with the actual dimensions of the various fixtures, cabinets, and other items to be placed in the bathroom. Do not depend on the size shown on a drawing template or a generic example in a computer program.


