The skill of arranging floral materials rapidly and skillfully into a corsage, table arrangement, wreath, or larger piece requires time to develop. Just as knowing how to read a recipe does not guarantee a successful result, neither will the first floral designs be flawless or easily accomplished. However, by following the assembly instructions and studying the illustrations, you can begin to develop proficiency. From this beginning point, further practice, added study, and experience will refine your construction technique and your eye for style.
Corsages
Corsages are most commonly pinned to clothing at the shoulder or banded to the wrist. On occasion, they may be pinned in the hair or carried as a nosegay. Teenage girls are the most frequent recipients of wrist corsages and nosegays. Adult women generally prefer to use corsages as accents to their personality, clothing, or a special occasion. Whenever possible, the florist needs some questions answered before the corsage can be designed correctly.
• What color is the garment to be worn? The flowers should complement the outfit, not compete with it. It is usually impossible to match the color of the flowers to the color of the garment, so contrasting colors are best used.
• What is the neckline of the garment? A sharply vertical neckline such
as a V-neck is best accented by a corsage that is also strongly vertical. A scooped neckline looks best with a corsage whose line is gently curved.
|
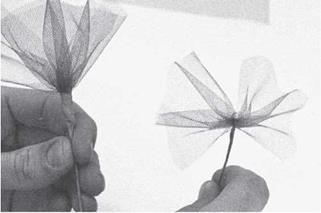
figure 7-15. Two styles of puffs: fan (left) and butterfly (right) (Deimar/Cengage Learning. Photo by Jack Ingeis.) |
• What is the occasion? Since corsages can be either formal or informal in style, it is helpful to know.
• What is the size of the wearer? Small women look best wearing a small corsage. Larger women need a larger corsage to retain the proper proportionate relationship between flowers and wearer.
• What is the skin tone of the wearer? Dark skinned women look better with pastel toned corsages. Fair skinned women often need more vivid colors to brighten their appearance.
• Does the wearer have a preference for, or an allergy to, certain flowers?
Obviously, the professional florist may not have all the information needed to create a totally customized corsage. However, too many florists ask only, “What color?” and overlook other equally vital information.
To prepare flowers for assembly into a corsage, all or most of the stems are removed and replaced with wired and taped stems. A moistened wad of cotton or chenille stem may be used to prolong the life of blossoms that wilt easily. The reason for removing the stems is to lighten the weight of the corsage and decrease the mass. Modern corsages must be lightweight so as not to pull and tear synthetic fabrics, but solidly constructed to stand up to today’s active lifestyle.
 |
 |
Although corsages can be made from one or two flowers, corsages made with an odd number of blossoms are most common and most interesting. Accordingly, that is the type to be described here (Figure 7-16).
To construct a corsage of three, five, or seven blossoms:
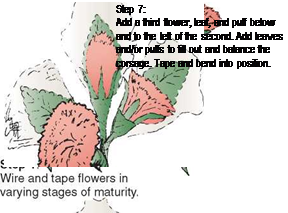
Step 1: Select flowers that have small blossom heads and are in varying stages of maturity. Wire and tape flowers.
Step 2: In one hand, place the smallest, most tightly closed blossom. This will be the uppermost flower of the corsage and determine the direction of wearing, since it always points upward.
Step 3: Behind the blossom, place an artificial or fresh leaf, allowing it to extend about an inch above the first flower.
Step 4: If net puffs are being used, one may be added at this point, behind the flower and leaf.
Step 5: Tape the stems together tightly.
Step 6: Add a second and slightly larger flower below the first and to the right. Positioning is accomplished by bending the wired stem as each flower, leaf, or puff is added.
Step 7: Add a third flower slightly lower and to the left of the second. Continue in this manner until the desired number of flowers have been added. (Reserve the most widely opened flowers for the base of the corsage.) Leaves and puffs should also be added where needed to provide shape and background. Do not twist the wired stems around each other. Instead, bind them with tape after every third stem is added to the corsage. Each flower, leaf, or puff counts as a stem.
Step 8: Add the bow to complete the corsage. Depending on the style of the corsage, the bow may be at the base, mixed with the base flowers, or at the side of the arrangement.
Step 9: Tape all wires and exposed ends. Add a corsage pin and place in a corsage bag or box. Store in a cooler.


