Design is a process—but not a neat, tidy, linear process. Moving from the idea, or the wish, for a new bathroom to the finished product involves much going back and forth, checking and rechecking. A bathroom design involves a dose of inspiration, a spark of creativity, but mostly a lot of hard work.
This book has presented a considerable amount of information about bathrooms, what to include and how to arrange the space. It has emphasized how to gather information about your clients to help focus your design to meet their needs and desires. This chapter will help you figure out how to organize this wealth of information and translate it into an actual bathroom design.
The first part of this chapter discusses the overall design process, how to move from an idea to a complete design. The second part focuses on the design program, the part of the design process where you organize all your information and ideas into a plan for the bathroom design. The third part, the design drawing, presents a method to move from a conceptual design to an actual design layout. Throughout are examples of a simple bathroom design moving from program to drawing.
While the focus here is on developing a single design drawing through use of the design process, in reality, you will probably use this process to develop several alternative designs to present to your client. These alternatives will then be evaluated by you and your client in making the final selections for the bathroom design.
Learning Objective 1: Describe and explain the stages of the design process.
Learning Objective 2: identify and describe the parts of a typical design program. Learning Objective 3: Use a design program to develop a completed design drawing.
THE DESIGN PROCESS
There are many different ways to approach design, probably as many as there are designers. As you gain more experience, you will develop a method and unique style that is personally successful.
If you are a new designer, you can benefit by following a formal structure for the design process. This will help you become adept at sequencing the steps in developing a design and assure that
 no parts of the process are forgotten. If you are an experienced designer, by reviewing a formal
design process, you may get a fresh approach and spark new creativity. What follows is a brief
discussion of one approach to the design process that is used by the authors.
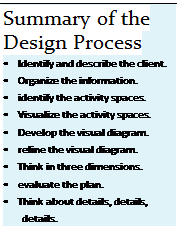
• Identify the client. Gather information about the client. This is both the tangible—such as anthropometric information and a list of items for storage—and intangible, such as ambience desired in the space or style preferences. Chapter 5, "Assessing Needs," provides a detailed guide to gathering information and assessing client needs. You may also want additional research at this stage, learning about things such as products or materials that the client wants. You also want to make sure that you are informed on issues that will influence design decisions, such as the need for accessible design, sustainable product choice, or multiculturalism.
• Organize the information. Develop the first part of your design program by determining the goals and objectives for the design. Prioritize the needs and wants of the client and identify the limitations of the project. (Design programming will be discussed in more detail later in this chapter.)
• Identify the activity spaces. Develop the second part of the design program by preparing the user analysis. The user analysis is a chart or table that groups design by the major activities that will take place in the bathroom space. (See Table 10.1 for an example of a user analysis.) In most cases, this will mean that you are organizing information by the activity centers described in Chapter 6, "Bathroom Planning."
Check your user analysis against the client needs assessment information (chapter 5, "Assessing Needs") to make sure that you have accommodated the client’s priority needs. You may even want to share the user analysis with the client as a double check.
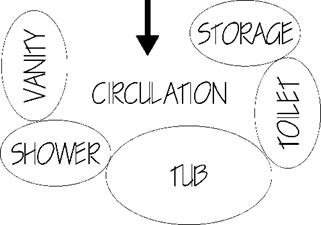
• Visualize the activity spaces. This is the stage when you are moving from verbal and quantitative information to visual ideas. Many designers use bubble diagrams to represent activity spaces or various centers, and to explore the relationships of the different spaces. For example, you may have a bubble for the bathing center, another for the toilet area, and so on. (See Figure 10.1 for an example of a bubble diagram.)
• Develop the visual diagram. Select the best two or three bubble diagrams for refinement. Prepare a room outline, to scale (1/2 inch equals 1 foot or a ratio of 1 to 20 in metric with mm or cm as your base), and note project parameters, such as walls, windows, or doors that are fixed in location.
Start using templates for each center or activity space, and place them on your room outline using the bubble diagrams as your guide. A template is a scale drawing representing the fixtures, cabinetry, and clearances for a center or activity space. (See Figures 10.2, 10.3, and 10.4 for examples of design templates.) Templates allow you to see how spaces fit together and how your design ideas will work in the actual bathroom space. Templates can be created by hand drafting or in computer-aided design software.
Check your visual diagram against the user analysis. Have you included all the requirements?
• 

Refine the visual diagram. You will be moving from the bubble diagram to the arrangement of templates to a sketch of a floor plan. Work in scale! Evaluate your visual diagram against the project parameters.
• Think in three dimensions. Use elevation or perspective sketches to develop the vertical elements for your design. Changes in the floor plan may be required.
• Evaluate the plan. Check the preliminary design against the design program. Review the relationship of the centers. Evaluate zoning and circulation within the bathroom as well as in relationship to adjacent rooms. Evaluate your plan against the Bathroom Planning Guidelines (see Table 10.3) and, if appropriate, the Bathroom Access Standards (see Table 10.4). Check your plan against any additional building code requirements.
Review the preliminary plan with the client. You may be working with more than one design option at this point, so gather feedback from the client.
• Think about details, details, details. Lay out the preferred design of the bathroom in dimensioned drawings. Select and specify the actual fixtures, cabinetry, materials, and other items in the space, so that you can verify sizes, installation requirements, clearances, and other details. Review product specifications against client priorities and realities as determined in the needs assessment and your research. Check dimensions to make sure that everything will fit as you envision. Review the final design with the client. Prepare the appropriate contract documents, such as needed for construction, code review, cost estimates, and bids.
The design process may not be complete at this point. For example, client review may require you to revise your plan. Or, products specified may, in fact, not be available. However, thinking through the parts of the design process does allow you to be thorough and careful, and results in a better design in the long run.


